
Presentation of Results
In terms of page size, there has been a great deal of debate over the years surrounding what is best and most practical. In Scotland, the Highland Council commissioned the University of Stirling to undertake a study into the appropriate image size on an A3 sheet of paper. The limitations of an A3 sheet of paper in itself greatly restricts the horizontal angle of view that can be presented, however it is a practical size of print for use on site.
Field tests have shown that the A3 page size is ideal for use on-site, whilst an A1 wide by A4 high (840 x 297mm) is more useful in the office to understand landscape and visual context.
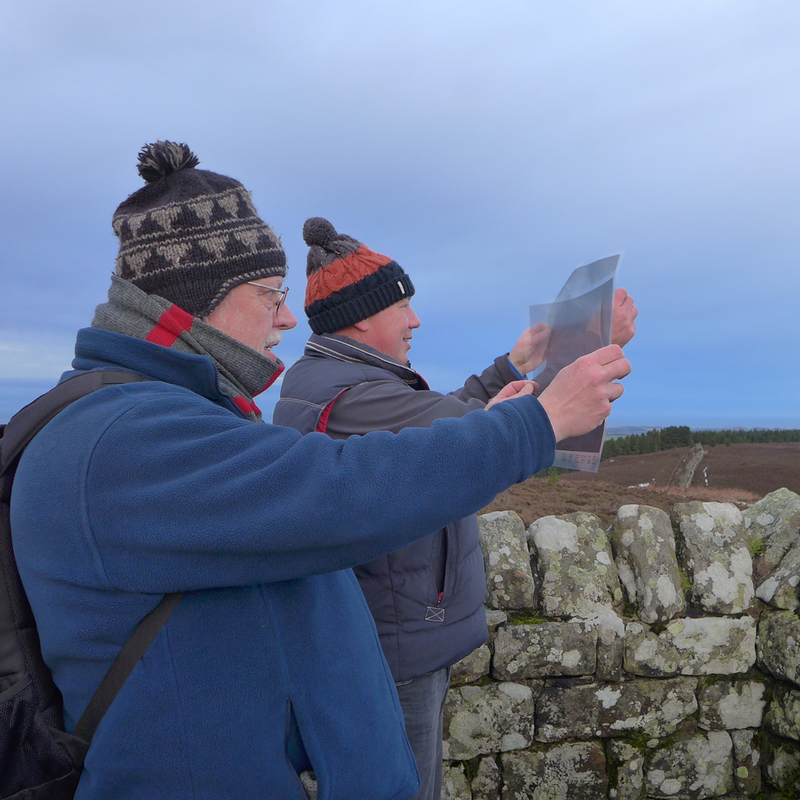
The use of acetates have also been tested on-site, which allow a printed photographic image to be held up and aligned with the actual view from the original camera location. This approach was originally part of The Highland Council Standards in 2010, but this was dropped following publication of the University of Stirling’s Report ‘The Effect of Focal Length on Perception of Scale and Depth in Landscape Photographs’, May 2012. This work undertook field tests in the Highlands of Scotland to understand what effective focal length of a printed image from a camera on an A3 sheet reflects the actual scale and detail in a view. The survey identified an effective focal length between 70 and 80mm best provides the most realistic representations of landscape scale and depth for the type of views considered during this study.
However, the University of Stirling study failed to consider the use of the printed image on acetate. What is interesting is that a 50mm effective focal length image printed at 36cm wide and 24cm high matches perfectly with the alignment of the view. The same effective focal length identified by the Highland Council as being 70-80mm does not work at all when printed on acetate. The acetate would need to held beyond a comfortable arm’s length away.
It therefore naturally follows that there is a difference in visual acuity between the printed image when viewed through acetate and the printed image when viewed on paper.
Field tests are currently being undertaken by the Landscape Institute across the UK in Northumberland, York, Bristol, London and Edinburgh to understand what is actually happening. A number of single photographs have been taken at different locations, then printed on A3 paper at different effective focal lengths: 30mm, 50mm, 55mm, 60mm, 65mm, 70mm & 75mm. The idea is that individuals identify which printed sheet best reflects the view they are trying to achieve in terms of size and scale.
The results are currently being collated. Early indications are that the ideal effective focal length when printed on an A3 sheet is between 60 to 75mm. However all participants agree that when using the acetate, a 50mm effective focal length image works perfectly.
What this means is that there is a change in visual acuity between the printed image on paper and the same image when viewed through an acetate. This possibly is a result of the monocular vs binocular debate. As humans we naturally use two eyes to read images (binocular). Yet a photograph is taken with a camera which has a single lens (monocular). To correctly read a photographic image we should really only be using one eye, and looking directly into the centre of the image. However this is not what humans naturally do. We use two eyes.
When holding the acetate up to gain the same perspective as the photograph, we naturally close one eye to help us line the acetate up with the view (monocular). However when viewing a printed sheet of paper we hold the image up at a comfortable distance and use two eyes to compare the image with the view. This is where the difference in visual acuity stems from: monocular vs binocular.
An additional issue is something called saccade. Saccade means the quick movement of an eye across an image, which is the natural way we look at the detail contained in photographs and in views. The geometry of a photographic image is only correct when you look with one eye into the middle of the image. Any movement of the eye (saccade) renders the geometry incorrect.
The Highland Council are also adamant that the planar presentation of photographs is necessary. However, independent tests cast doubt over this approach, largely because the geometry of the image is only correct when, with one eye closed, you look directly into the central point of the photograph. Any movement of the eye away from this point renders the geometry incorrect. This is an important point when considering the accuracy of any 3D modelling superimposed on a photograph: it is only geometrically accurate when viewing the middle of the image.
Other governing bodies, such as Scottish Natural Heritage and the Landscape Institute, recommend the use of cylindrical projection images. This allows the use of a wider horizontal angle of view and doesn’t restrict the consultant to a single A3 sheet of paper to present the results.
A Technical Methodology should accompany all verified photography work, giving a clear and transparent explanation as to how the work has been undertaken and how the resultant images should be printed and viewed.
Panoramic Visualisations
One of the greatest problems with presentation of visualisations is the limitation of the width (and height) of a standard sheet of paper.
Planar projection visualisations should be imited to less than 60 degrees as wider fields of view result in increasingly distorted photographic imagery. Cylindrical visualisations can be presented the full 360 degrees. To achieve the full 360 degrees A1 wide paper shets can be used. Dependng on the required Effective Focal Length, either 4 (50mm EFL) or 6 (75mm EFL) separate sheets can be used
In 2010 the Highland Council recommended the use of panoramic viewers for presenting wide panoramas. These are incredibly useful and an ideal technique for sharing both baseline photography and visualisations. This avoids the need for expensive printing and allows users to zoom into the detail of the view. There are a number of examples of projects presented in this way below:
 Flaxby
 Tigne Point, Malta

for Illustration of Accurate Visual Impacts
to view in a separate tab.
Existing View Single Frame Image (A3 acetate)

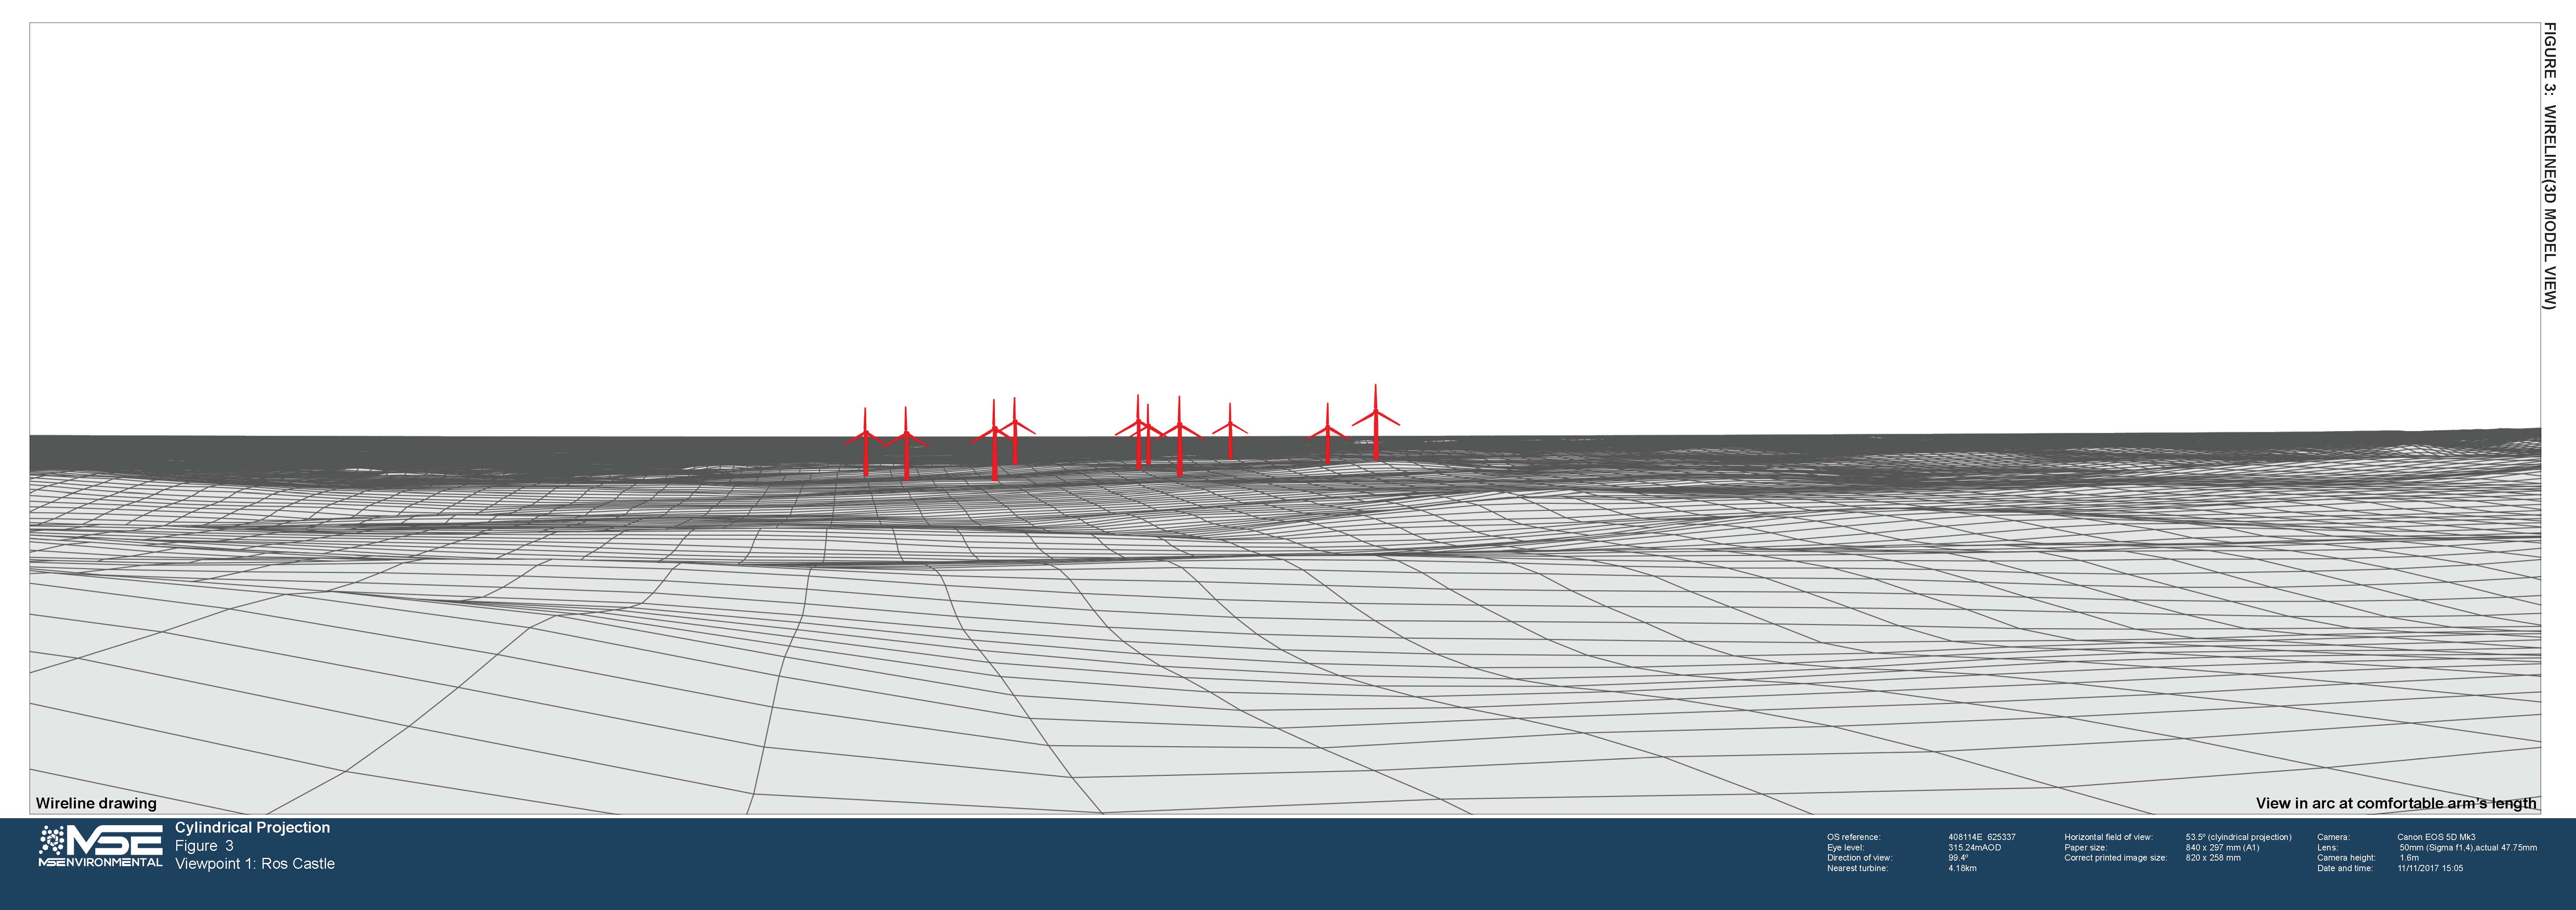
Baseline Photograph and Wireline (3D Model)
90 Degree View (A1 wide x A4 high on paper)

Wireline (3D Model) 53.5 Degree View
(A1 wide x A4 high on paper)
Wireline (3D Model) 53.5 Degree View
(A1 wide x A4 high on paper)

Photomontage 53.5 Degree View
(A1 wide x A4 high on paper)

Photomontage 65mm Effective Focal Length
Planar (A3 on paper)

Photomontage 65mm Effective Focal Length
Cylindrical (A3 on paper)